Tuesday, January 28, 2014

no renovations

 photo IMG_1196_zps0f7d95ca.jpg

Here’s the truth: I really don’t like recipes all that much. Typically, when I’m interested in a making a particular dish, I will google a couple methods, talk to a few trusted people and then use the loose interpretation of those instructions as my base. And then I just simply do my own thang. Because I’m a m-----r f-----n renegade. And let us not be fooled, this method totally blows up in my face sometimes. But how else will I learn? It’s not that I don’t read cookbooks or the many food magazines I receive each month. In fact, I read them with the rapt attention that most of us reserve for the consumption of the Star Tracks portion of People Magazine (McConahey! Shirtless Jogging! AGAIN?!) And then, after reading, I stash them on a shelf in my kitchen and pretty much never refer to them again.

 photo IMG_1164_zpsa66b3cd3.jpg

But then came Chang. Joanne Chang, that is, and her Flour, Too cookbook; which was given to me by my Aunt Sally as a housewarming gift. Hit after hit after hit. This thing is SOLID GOLD. It’s like the Jay Z Blueprint of cookbooks. I have yet to EVEN make a substitution- that’s how blindly in love with this thing I am. First, it gave me yet another delicious lentil soup; then an appetizer for New Years Day; and then, last week, on a freezing cold Wednesday night it gave me one of the simplest, most satisfying healthy dinners I have had in recent memory. So here for you I present in their entirety, with absolutely no typical Porky-style renovations, unblemished, tasty perfection in the form of Scallion Pancakes and Mama Chang’s Hot and Sour Soup. I am literally counting the days until I can make this soup again. It takes all of 20 minutes to throw together, incorporates about 5 of my most favorite ingredients (pork, tofu, mushrooms, Sriracha, soy) and is just so damn good. GO! Make it! I’m running out of exclamation points.

 photo IMG_1166_zps5fd650e2.jpg

MAMA CHANG’S HOT and SOUR SOUP

2 tbsp. vegetable oil
1 garlic clove, smashed and minced
1 tbsp. peeled and minced fresh ginger
4 scallions, minced; plus two tbsp. for garnish
8 oz. ground pork
4 cups chicken stock
1 lb. block firm tofu, cut into ½ inch cubes
4-5 button mushrooms, cleaned and sliced
1 tsp. granulated sugar
2/3 cup rice vinegar
3 tbsp. soy sauce
1 tsp. freshly ground black pepper
1 tbsp. sesame oil; plus 2 tsp. for garnish
1 tbsp. Sriracha sauce
2 large eggs

In a large saucepan or Dutch oven, heat oil over medium-high heat. Add pork, garlic, ginger and scallions and sauté, breaking up a bit, for about one minute. Add the chicken stock and bring up to a simmer. Add the tofu, mushrooms, sugar, vinegar, soy sauce, black pepper, sesame oil, sriracha and bring the soup back up to a simmer over medium-high heat.

Taste and add more sriracha if you would like more spice, more vinegar if you want more sour. I added probably another tablespoon of hot sauce and vinegar, as well as another little pinch of sugar. In a small bowl, whisk the eggs until blended and with the soup at a steady simmer (meaning there are some bubbles, but it is not a hard boil) slowly whisk in the eggs so they form strands. Divide the soup among 4 bowls and garnish each with a few drops sesame oil and some chopped scallions. Serve immediately.

 photo IMG_1167_zps653a8974.jpg

SCALLION PANCAKES

8-9 scallions, minced
¼ cup sesame oil
1 ¼ tsp. kosher salt
1 lb store bought pizza dough
About 1 ½ cups vegetable oil, for frying

DIPPING SAUCE

3 tbsp. soy sauce
½ tsp. sriracha sauce
½ tsp. sesame oil
1 tbsp. peeled and minced ginger
1 tsp. rice vinegar
1 tbsp. granulated sugar
1 scallion, minced

 photo IMG_1168_zpsb3b3a73f.jpg

In a small bowl, mix together the scallions, sesame oil and salt. Cut the dough into thirds. On a well floured surface roll out one portion into a thin rectangle, about 5x10 inches. Spread a few spoonfuls of the scallion mixture evenly over the dough, leaving about a ½ inch border the whole way around. Starting at a long side, roll up each rectangle and pinch the seam together to form a seal. Spiral each roll into a snail-looking coil and tuck the ends under. Repeat with each remaining section of dough and place all three coils in a warm area, covered loosely with plastic wrap for two hours.

 photo IMG_1165_zpsfd1a3d70.jpg

On a generously floured surface, press each coil into a flat circle and roll out into a flattened circle, about 10 inches in diameter. It’s fine if some of the scallion/sesame juice squishes out the sides a bit, but you may need more flour to prevent sticking to the counter. Heat oil in a large cast iron skillet over medium-high heat, until it is super hot and shimmering. While the oil heats, make the dipping sauce by whisking all ingredients together in a small bowl, or putting them all in a jar and giving it a few strong shakes.

 photo IMG_1169_zpsa3992aab.jpg

To tell whether the oil is ready for frying: flick a pinch of flour in; if it sizzles, the temperature is right. Carefully add one pancake to the oil and fry for about 2 minutes per side, until golden colored. Transfer to the prepared baking sheet and continue with the other two batches of dough. Let the oil come back up to temperature between each pancake by taking that time to roll out the next disk.

 photo IMG_1199_zps780f3bb0.jpg

Creative Commons License

Thursday, January 16, 2014

oh, sherry

 photo IMG_1127_zpsb597bd4f.jpg

I have to say, for the first time in my life, I think I have something in common with Steve Perry. Something else, that is, besides awkward bang length, a penchant for high kicks and AMAZING vocal range. What we have in common is that I understand now, how he could love Sherrie so, so much. So much that he would risk alienating his fellow band members to maintain their relationship at all costs (we’ve been watching a lot of Behind the Music lately). What I’m saying is that I might risk everything to be with sherry, too; because it’s just that good.

 photo IMG_1095_zps993f8612.jpg

However I am not speaking of former Perry paramour, Sherrie Swafford, but sherry of the liquid varietal. I bought a bottle a few months back to make a particular chicken dish and since then have been splashing this sweet nectar into just about every savory dish I make. It adds a depth of flavor and complexity that is simply to die for and I feel like a fancy chef who’s in the know whenever I uncap the bottle and splash it into the pan. It also elevates these regular old stuffed mushrooms from something tasty, to something worth writing a love song over.

 photo IMG_1099_zps474b30ad.jpg

Now, I’m willing to bet that you judge sherry as an ingredient that is simply too fussy to stock in the pantry on a regular basis and I tell ya, I used to be one of you. As my sister-in-law said, “If I see a recipe that calls for sherry, I usually just look for a different recipe.” It seems like a commitment, right? To buy that whole bottle only to use a half cup and then banish it to the floor of the pantry next to the crème de menthe. I get it. I really do. I try my hardest not to cook anything that calls for difficult ingredients. But let me tell you something: sherry is shelf stable and cheap (there’s a reason it has been the chosen beverage of thrifty grandmas for decades) which means it can kick it in the pantry and come out a few times a year when you find one of those recipes that calls for it. But I can bet you’ll be busting it out more often than that.

 photo IMG_1102_zps534931e2.jpg

VEGETARIAN STUFFED MUSHROOMS

24 cremini or button mushrooms
2 shallots, minced
3 cloves garlic, minced
1 red bell pepper, minced
1 cup grated parmesan cheese
¾ walnuts, toasted
¾ cup panko breadcrumbs
3 tablespoons butter, divided
¼ cup sherry
¼ cup coarsely chopped flat leaf parsley
Salt
Pepper

 photo IMG_1107_zps8311f17c.jpg

Preheat oven to 375. Heat one tablespoon of butter in a large skillet over medium heat, add breadcrumbs and toast until golden brown and fragrant, set aside. In a small, dry skillet toast walnuts over low heat until fragrant and slightly browned, set aside. While the breadcrumbs and nuts toast: clean mushrooms by wiping with a damp cloth and snap out the stems, reserving. Any caps that break during this process can be relegated to the stems pile. Set mushroom caps aside and coarsely chop all of the stems. (Mushroom stems in fancy chef speak are known as “duxelle” I know this because on our wedding menu we had Marsala and Duxelle Stuffed Mushrooms and I was like “what’s ‘duxelle’?” and our catering manager was like “mushroom stems.” I've been chucking perfectly good duxelle in the trash for years. Color me informed. If I was putting these on a restaurant menu I would called them Walnut, Sherry and Duxelle Stuffed Mushrooms, but since this is Porky Dickens, we’re going with the easy search term, you can do as you please, depending on who you’re trying to impress.)

 photo IMG_1111_zps90962833.jpg

Wipe out large skillet and heat remaining tablespoons butter over medium high heat, add shallots and sauté 2-3 minutes, then add garlic, red pepper and chopped stems, excuse me, duxelle. Sauté, stirring occasionally, until mushrooms are nicely browned and have released their juices; adding another half pat of butter if the pan seems dry at all (about 7-8 minutes). Raise heat just a touch and pour in sherry. Use a wooden spoon to scrape any browned bits of mushroom or shallot off the bottom of the pan as the liquor reduces, about another 5 minutes. Season with a generous pinch of salt and a few cranks of pepper. Remove pan from heat and let cool a bit.

 photo IMG_1113_zpscc1eb2c0.jpg

In the bowl of a food processor, combine sautéed mushroom mixture, parmesan, breadcrumbs, walnuts and parsley, along with another pinch of salt and pepper. Pulse to combine well, until the mixture resembles a super course meal, but individual elements are still visible (i.e. you can still see flecks of red pepper and parsley). Taste and season if necessary and pulse once or twice more to combine. Use a soup spoon to smoosh a generous scoop of filling into each mushroom cap. Lightly grease a baking sheet with a bit of olive oil and bake until bronzed on top, about 30-35 minutes.

   photo IMG_1115_zps01d799e9.jpg  photo IMG_1116_zpsd82db774.jpg

To make ahead: Once my mushroom caps were stuffed, I placed all of them on cookie sheets and placed them straight into the freezer for a few hours. Once the stuffed mushrooms had frozen solid, I bagged them up for easy transport. They held together very well this way and can be baked straight out of the freezer; it may simply increase the cooking time just a bit.

   photo IMG_1128_zps9ee5281d.jpg  photo IMG_1130_zps11572620.jpg

What kind of sherry? Good question. You will typically find three popular kinds of sherry on the shelf: fino, amontillado and cream. Fino is the driest of the lot, amontillado is medium-bodied and the most versatile, but I prefer cream sherry, it has a silkiness I really like and enough residual sugar to make it useful in both savory dishes and desserts. The brand I have is Ivison, which is a solid choice and retails for about $11.

Creative Commons License

Thursday, January 9, 2014

soup and semantics

 photo IMG_1140_zps5bf2f746.jpg

Soup seems like an appropriate choice this week, thanks to the (ridiculously named) Polar Vortex that has been chapping skins and freezing eyelids across the nation. Seriously weather people? Polar Vortex? It sounds like a place where the villain in a Carebears movie would live. What is with the weather channel and its hard core love of strong consonants? Winter Blitz, Arctic Freeze, Polar Vortex. Come on dudes, you’re reporting the weather, not writing a comic book. Take it down a notch. But we don’t need to get into a debate about semantics, let’s just get to the soup, shall we?

 photo IMG_1133_zpsa3499266.jpg

I made this particular soup a few weeks back when I hosted my girlfriends for our Christmas get together. In the interest of making something satisfying and simple in addition to appetizers and desserts we had a big pot of this, some crusty bread and a salad. Now history serves that I have never met a lentil that I didn’t like and I previously whipped together a fairly similar soup during last year’s massive three day blizzard (who wants to move to Massachusetts? Seriously, the winters are TO DIE for!) but this particular soup, from Joanne Chang’s Flour, Too cookbook, was Next Level. A magical blend of spices makes it slightly smoky, spiced and fragrant, the sausage lends salt and depth of flavor and the plethora of root vegetables brings a little hit of sweetness that makes for a soup that is truly out-of-sight good. The list of ingredients is daunting, I know, but TRUST: it’s worth it. I would never steer you wrong when it comes to soup.

Photo note: without fail, whenever I peel vegetables both my cats run over and sit next to the trash trying to catch them. So here's a few gratuitous kitty photos of Bea showing some carrot skins who's boss.

 photo IMG_1137_zpsc58d2a5b.jpg  photo IMG_1138_zps4bf4e892.jpg

SAUSAGE and FRENCH LENTIL SOUP with ROOT VEGETABLES
(just barely altered from Flour, Too)

1 tbsp. vegetable oil
2 links sweet Italian sausage
1 medium onion, diced
2 cloves garlic, minced
1 large carrot, peeled and diced
2 stalks celery, diced
½ bulb fennel, trimmed and diced
2 tbsp. tomato paste
½ tsp. kosher salt, plus 1 tbsp., divided
2 bay leaves
1 tbsp. smoked paprika
1-2 sprigs fresh thyme (or ½ tsp. dried)
1 tsp. ground turmeric
1 tsp. dried oregano
¾ tsp. ground cumin
½ tsp. curry powder
¼ tsp. ground cinnamon
1 small potato, peeled and diced
1 large parsnip, peeled and diced
7-8 cremini mushrooms, cleaned and chopped
1 small turnip, peeled and diced
¼ small butternut squash, peeled and diced
2 quarts vegetable or chicken stock
1 small can crushed tomatoes
1 tsp. ground black pepper
¾ cup French lentils, rinsed
2 cups packed greens: such as kale, rainbow chard or escarole

 photo IMG_1134_zpsf0d20ef4.jpg

Heat vegetable oil in a Dutch oven over medium-high heat, spilt the casing on the sausage links, squeeze the meat into the pot and brown, breaking up into crumbles with a wooden spoon, about 3-4 minutes. Remove the sausage from the pot and set aside. Add onion, garlic, carrot, celery and fennel and sauté together for a few minutes, using your wooden spoon to scrape up any browned bits of sausage that are stuck to the bottom. Reduce heat to medium low and stir in the tomato paste, salt and bay leaves, stirring together completely to thoroughly coat the vegetables with the tomato paste. Reduce the heat to low and add all herbs and spices: paprika, thyme, turmeric, oregano, cumin, curry powder and cinnamon and stir together for 3-4 minutes to toast the spices. (The sole alteration I made to this recipe was that it called for fennel seed among the spices. When I realized I had none I simply sliced up a half bulb of fennel I had in my fridge. I think you could effectively do either depending on what you have on hand.)

 photo IMG_1139_zps49f2edfb.jpg

Add to the pot the reserved sausage as well as the potato, parsnip, mushrooms, turnip and squash and stir everything together well. Add the tomatoes and stock and the remaining tbsp. salt and pepper. Raise the heat to high and bring to a boil; reduce heat to a simmer and let it crank for 10 minutes. Add lentils and simmer, 40-45 minutes, until the lentils are tender. Stir in whichever greens you are using and let soften 1-2 minutes more. Fish out the bay leaves and sprig of thyme (the leaves will have fallen off, leaving just the stem). Ladle into bowls and serve immediately, with a few pinches of grated parmesan on top.

 photo IMG_1136_zps6ce934ad.jpg

Make this vegetarian by omitting the sausage, upping the number of mushrooms and subbing veggie stock in for chicken.

Creative Commons License

Thursday, January 2, 2014

a calculated risk

 photo IMG_1163_zps695ea69e.jpg

Whenever I don’t get the chance to come around here and share food, I get a little on edge. Spending time in the kitchen is always rewarding, but it truly feels even more so to me if I can settle in here to share the experiences with you. I apologize for my absences throughout the past months. It turns out moving into a house and working retail during the most punishing time of the year were just about all I could handle in October, November and December. But I cooked my ass off, and I am finally here, on a snowy winter day, with a whole group of hours to myself, to be able to share what I’ve been doing.

 photo IMG_1142_zps88db8ff9.jpg

And nothing will be right with the world if I don’t tell you about the roast beast to end all roast beasts that I cooked on Christmas Eve. So not only am I back with a post to greet the new year, but it’s a 2000 word treatise on how I dry rubbed and grill roasted prime rib for 20 and lived to tell about it. It was simply delicious and VERY exciting. I decided to grill my roast out of sheer logistical necessity, because where my family is gigantic, my 1960 wall oven is puny and well, we needed somewhere to heat the potatoes, so the beef got confined to the grill. No big deal, right? One of the most expensive cuts of meat you can buy, one of the riskiest cooking methods ever. I asked myself many times in the weeks leading up to Christmas Eve if I in fact was psychotic for planning on doing this.

 photo IMG_1144_zpse2810747.jpg

BUT, plenty of research, talking it out with anyone and everyone who would listen and a little leap-of-faith-blind-confidence “I can do it!” attitude (plus a half bottle of Laurent-Perrier Brut Rose Champagne while cooking) and I was able to bring to the table the roast of all roasts. It was truly spectacular. I have to say I LIKE it when risks pay off!

 photo IMG_1145_zps1ffb4c25.jpg

To be completely fair and give full credit where credit’s due, I researched this process exhaustively online and ultimately found THIS invaluable article by grilling expert/ meat aficionado Meathead Goldwyn. I pretty much followed this recipe and technique to a T and was gifted with the most delicious prime rib of all time. If you have a basic knowledge of cooking, an excellent meat thermometer and you follow this guide, you will truly be rewarded with the most delicious prime rib roast OF ALL TIME, I promise. And you will have space in the oven for the asparagus, twice baked potatoes and macaroni and cheese.

 photo IMG_1146_zps84e195dd.jpg

GRILLED PRIME RIB
(serves 8-10*)

BEEF:

7-8 lb. prime rib eye (boned, trimmed and tied)
Olive oil

RUB:

¼ cup kosher salt
2-3 tbs. pink peppercorns
2-3 tbs. black peppercorns
2-3 sprigs fresh rosemary
2 tsp. garlic powder
Pinch smoked paprika

AU JUS:

32 oz. container beef stock
½ cup dry red wine (I used a Cab. from Chile)
1 carrot, peeled and left whole
1 stem celery, washed and left whole
1 onion, halved and peeled
1 shallot, halved and peeled
4 cloves garlic, peeled and left whole
2 sprigs fresh thyme
2-3 sprigs fresh rosemary

SPECIAL EQUIPMENT: 

A highly accurate instant read thermometer
Gas grill with a full tank of propane

*I doubled everything here (except the rub) and had enough for 14 adults and 6 children plus enough leftovers to make a beef pot pie.

 photo IMG_1147_zps6e444afb.jpg

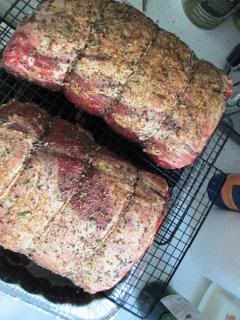
24 Hours before cooking dry rub the beast:

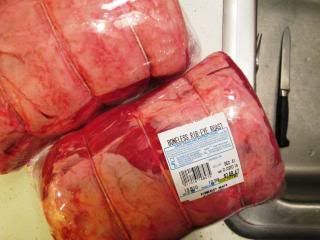
When cooking a big, giant, show-stopping roast, I suggest hitting up a high quality butcher shop. Not only will the crew working there know enough to help you figure out exactly how many pounds your roast should be to adequately feed your crowd; they will also bone, trim and tie your roast for you, so it’s manageable and ready to go. You will want to purchase your roast one day before cooking, so as to dry rub and air chill it in the fridge.

 photo IMG_1148_zps02490ea3.jpg

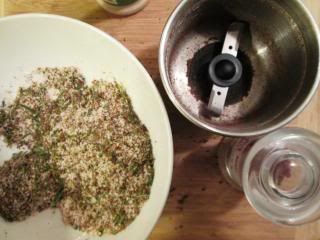
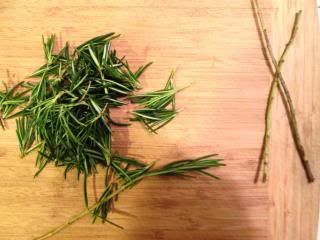
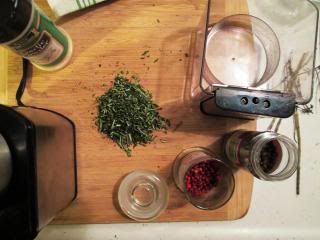
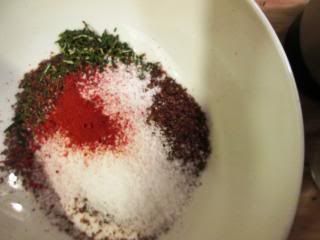
Remove roast from packaging and pat dry with paper towels. Place in a large roasting pan and set aside while you prepare your dry rub. Pull rosemary from stems and finely chop with kitchen shears. Combine black and pink peppercorns in a clean coffee or spice grinder and grind until coarsely chopped. Combine kosher salt, crushed peppercorns, garlic powder, rosemary and paprika in a bowl and stir together. Drizzle a few tablespoons of oil over the roast and smooth over all sides. Scoop a generous handful of rub and smooth onto the bottom, sides and end; turn and rub another scoop onto the top. The ‘top’ of your roast for both chilling and cooking purposes is always the side with the fat. Set roasting pan in fridge, uncovered, to chill overnight.

 photo IMG_1149_zpsd7823fa4.jpg

2-3 hours before cooking the beast:

Remove roast from the fridge and let sit at room temperature. If you have curious pets, set another roasting pan over the top, to protect it, especially if it’s going to be unattended. It is crucial to let a roast this large (or any good cut of red meat for that matter) sit at room temperature prior to cooking. It will ensure more even roasting and a shorter cook time. I had 14 pounds of solid beef happening, so I had mine at room temp. for over three hours before cooking. Do not get sketched out by this, any microbes will be killed during the cooking process. No one died or vomited at my Christmas Eve, I can assure you.

 photo IMG_1152_zpsa6d6be30.jpg

Set up the drip pan: 
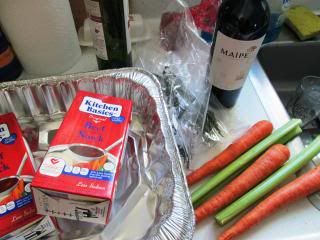
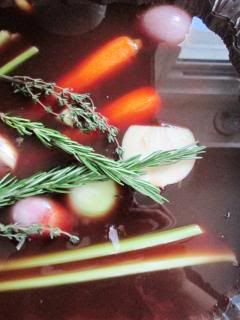
If you have a giant roasting pan that can fit comfortably on your grill, you may use it. The pans I had both had large handles, which wouldn’t allow for the grill cover to close. So what I used was two giant aluminum roasting pans from the dollar store. I would suggest definitely doubling them up for stability, since they are a bit flimsy on their own. In the pan combine beef stock, wine, herbs, carrots, garlic, shallot, onion and celery. The veggies will be discarded eventually, so leave them whole or simply halved and peeled for simplicity’s sake. This pan full of savory juices will be not only a drip pan for the fat from the roast, but also the base for your jus, or gravy. I’ll use the term jus here for consistency’s sake and also because it is, in my opinion, far too thin to be considered a gravy.

 photo IMG_1153_zps5bb03ff9.jpg

Over the drip pan, arrange a cookie cooling rack so it sits in a stable fashion, and place the roast (fat side up) on top. This is your grill roasting rig. Admire it for a few moments, lift it carefully to feel how heavy/stable it is and respect the fact that there is a large amount of liquid and meat weight on a fairly flimsy pan. If you are careful, you will be able to ease this thing out the door and onto the grill without much incident; if you are me, you will probably end up with a splash of beef broth between your toes and on your jeans, but either way, the roast will survive.

 photo IMG_1157_zps5f8d9523.jpg

Preheat the grill for indirect grilling about 30 minutes before starting:

“Indirect grilling” means that the protein you are cooking will be positioned over the unheated part of the grill, while only one, or perhaps two burners will be set to medium or low. I set one burner to high and when my temperature was still a little under 325, I turned the middle burner on to low. The drip pan and roast were set over the ‘cold’ part of the grill and in this way warm air circulates all around the roast, just like in an oven. The bonus of the grill: a little touch of smokiness and a delicious crust from direct searing at the END of cooking, not the beginning. I believe the reason my grill needed two burners to reach temperature was because it was very, very cold on Christmas Eve. So take into consideration any external temperature or precipitation.

 photo IMG_1158_zps05b5a31b.jpg

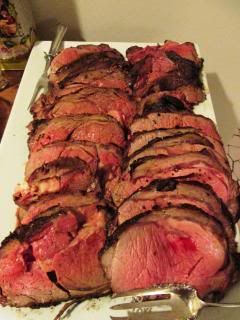
Set roast on the grill, close lid and set timer for one hour. Check the temperature at one hour and not before; then, check the temperature every fifteen minutes thereafter. For a perfect medium-rare roast, pull the meat and drip pan off the grill at 115 degrees. The roast will come up another 5-8 degrees while directly searing the outside. Sear over the hot part of the grill on all four sides, about 5 minutes per side, until the internal temperature reaches 128. Pull the roast and let rest at room temperature for 20-30 minutes. I allowed mine to rest for upwards of 45 minutes. The internal temperature will rise another 5 degrees during this time, resulting in a spectacularly perfect, deep magenta pink colored, medium rare 135 degrees.

 photo IMG_1159_zpsd1dbd113.jpg

While the meat rests, strain the solids out of the drip pan and set the juice to boil and reduce. Let it crank and thicken with just a touch of flour if desired. Many people in your house may say to you “the gravy is boiling shouldn’t you turn it down?” Ignore them, and really just let it rip. It’s quite thin to start out and this will thicken it up just a bit and concentrate all the delightful flavors within. The hot jus will also help to warm the meat once sliced, as well as it will taste like liquid heaven. When ready to serve, slice the roast into thick ¾ inch slices and ladle jus over. Then prepare yourself to be showered with compliments and praise. As my niece Isabel said “it tastes like meat wrapped in heaven.”

 photo IMG_1161_zpsca87d23d.jpg

This whole process was one of strategy, math and close temperature monitoring. Since I am good at none of these things, I strategized in depth and created a timeline which was my guide to the evening. I knew we wanted to eat around 7, minus 45 minutes for resting the meat, minus 20 minutes for searing, minus the roasting cook time, which I calculated to be about 2 hours. I suggest when you’re entertaining in a formal style, with a sit-down dinner time like this; reverse time-lining can be your best friend. I also used this kind of strategy when planning my wedding. If you know the reception has to end at X time, work backwards from there and give yourself an hour of wiggle room for issues. In cooking a large cut of meat in a non-traditional method, also always give yourself an extra hour cushion to account for any issues. Plan for the unexpected, but ultimately take a leap of faith and trust your instincts. I am by no means a grill master, but I basically edited all my cooking for Christmas Eve so that everything besides the roast was dead-simple and prepped two days before. I was determined not only to host but to enjoy myself, and with the help of everyone else and careful mental, mathematical scheming, I was able to do just that.

 photo IMG_1162_zps88f7fd59.jpg

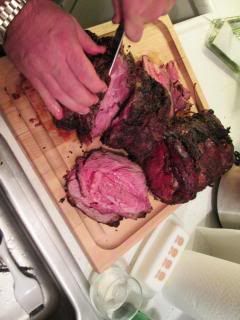
(special cameo by my brother, Jason, who really missed out on a second career as a hand model)

Creative Commons License
 
Creative Commons License
This work is licensed under a Creative Commons Attribution-Noncommercial-No Derivative Works 3.0 Unported License.